• Home
  • Flying
    • First Flight
  • Build by Chapter
    • Ch 3 Education
    • Ch 4 Fuselage Bulkheads
    • Ch 5 Fuselage Sides
    • Ch 6 Fuselage Assembly
    • Ch 7 Fuselage Exterior
    • Ch 8 Roll Over/Seat Belts
    • Ch 9 Main Gear/Landing Brake
    • Ch 10 Canard
    • Ch 11 Elevators
    • Ch 12 Canard Installation
    • Ch 13 Nose and Nose Gear
    • Ch 14 CenterSection Spar
    • Ch 15 Firewall and Accessories
    • Ch 16 Control System
    • Ch 17 Roll/Pitch Trim System
    • Ch 18 Canopy
    • Ch 19 Wings, Alierons
    • Ch 20 Winglets/Rudders
    • Ch 21 Strakes – Fuel/Baggage
    • Ch 22 Electrical System
    • Ch 23 Engine Installation
    • Ch 24 Covers/Consoles
    • Ch 25 Finishing
    • Ch 26 Upholstry
  • Build Mods
    • Liquid Cooling, Numbers, Weights and Flow
    • Cooling
      • Solving Ground Cooling 1
      • Solving Ground Cooling 2
      • Solving Ground Cooling 3
      • Solving Ground Cooling 4
      • Solving Ground Cooling 5
      • Solving Ground Cooling 6
      • Solving Ground Cooling7 – Test Data
      • Solving Ground Cooling 8 – Flap Building
      • Solving Ground Cooling 9 – Hinges
      • Solving Ground Cooling 10 – Lower Flaps
      • Solving Ground Cooling 11 – Upper Flaps
      • Solving Ground Cooling 12 – Completed
      • Solving Ground Cooling 13 – Update
      • Cooling the Beast 1
      • Cooling the Beast 2 – Lower Cowl Expansion
      • Cooling the Beast 3 – KW Oil Cooler Diffuser
    • EVS (Enhanced Vision System)
    • Cowl Keeper
    • Rudder Gust Locks
    • Wing Fences
    • Post Cure
    • Hinge Upgrade
    • RAM Air & Hellhole Cover
    • Main Gear Beef Up
    • Pilot Side Windows
    • Baggage Pods
    • Winglet Intersection Fairings
    • Titanium Rollover
    • Nose Gear Doors
    • Wheel Pants/Gear Leg Fairing
    • Cabin heating System
    • Fuel System
    • Roll and Pitch Trim
    • Oxygen System
    • The Ferry Tank
    • Cruise Angle Indicator
    • Fire Extinguisher Install
  • Round the World
    • RTW Route East #12 rev2
    • Survival Equipment
    • Training Flights
  • Other Stuff
    • Blog
    • Could You Reincarnate as an AI?
    • XEZ Long-EZ Interview Jan 2026
    • Around the World: RAAUS Sport Pilot Issue 110
    • Summary Feb ’24 from an SAAA Meeting
    • AOPA Pilot 27th Sept 2019
    • Taxi Tests
    • Build Tests
    • Flying Stories
      • A Long Easy Dream ’06
      • Townsville ’07
      • Cairns ’08
      • Albany ’08
      • East Coast ’08
      • Brisbane ’09
      • Cairns ’10
      • Perth ’10
    • Non Build Mods
      • F16 Scoop for JZE
      • Ram Air Box for JZE
      • Strange Tips
    • Milestones
    • Links
  • Contact

Blog

Home
Ch 21 Strakes - Fuel/Baggage
Fuel Sensors Install 1

Fuel Sensors Install 1

8 years ago
Dave Berenholtz
Ch 21 Strakes - Fuel/Baggage
Date:  06-05-2018
Number of Hours:  7
Manual Reference:  no ref

Time for the fuel sensors to go into the strakes. I’ve spent a huge amount of time pondering and researching how to do this. My issue was using Avgas but perhaps some Mogas at times too. Once I go there, capacitance probes can be 40% out. I can’t re-calibrate on the fly and what if I shandy the fuel? This would mean completely unreliable fuel gauges. The only time this might be critical is for very long flights over water… exactly when I might not want false readings. So no capacitance probes for this plane.

My solution is a mix of optical fuel sensors and the old school sight gauges. I also need an electrical signal to work my ferry tank top up system. I’ve gone for the GEM ELS-950 level switches. These optical electric ‘switches’ just tell you liquid or ‘no liquid’. It doesn’t care about the specific gravity of the fuel as capacitance sensors do.

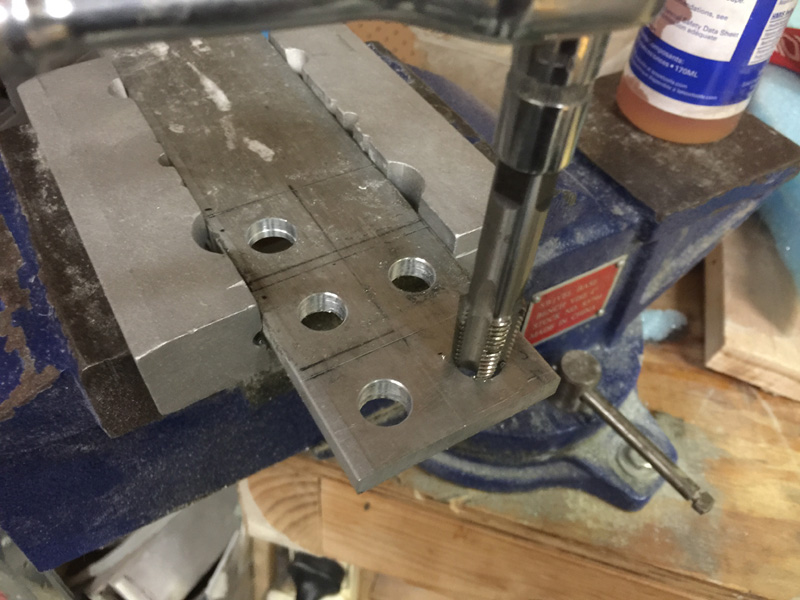
I used 2024 T3 1/4″ thick for the hard points. A 1/4″ NPT tap is used for the sensors. I also made a hard point for the AUX tank (or ferry tank) line which will be an AN firewall fitting.

Here I’ve cut the foam down to the inside glass for installing the hardpoints.

The positioning of these fuel sensors has been a year or so in the making. I finally realised that I have one fuel tank, not two (or three) and I don’t need sensors on both sides because the engine thinks there is only one tank supplying it.

I’ve then thought about what indications are useful in flight and what do I want the auto fill from the ferry tank to operate on which levels? I have a calculated guess that full fuel will be 300Lts in my modified strakes. Given the spar is 8″ in depth and allowing for 9″ depth maximum height as it is a little more forward, I could work out positions for the sensors as well. My decisions are:-

4/4 Full fuel at the Spar (which is not 100% full) about 275L  as high as possible (right)
2/3 about 200L    5.3″ (from the bottom of the strake)   (left)
2/5 about 120L    3.2″ (right)
1/5 about 60L      1.6″ (left)

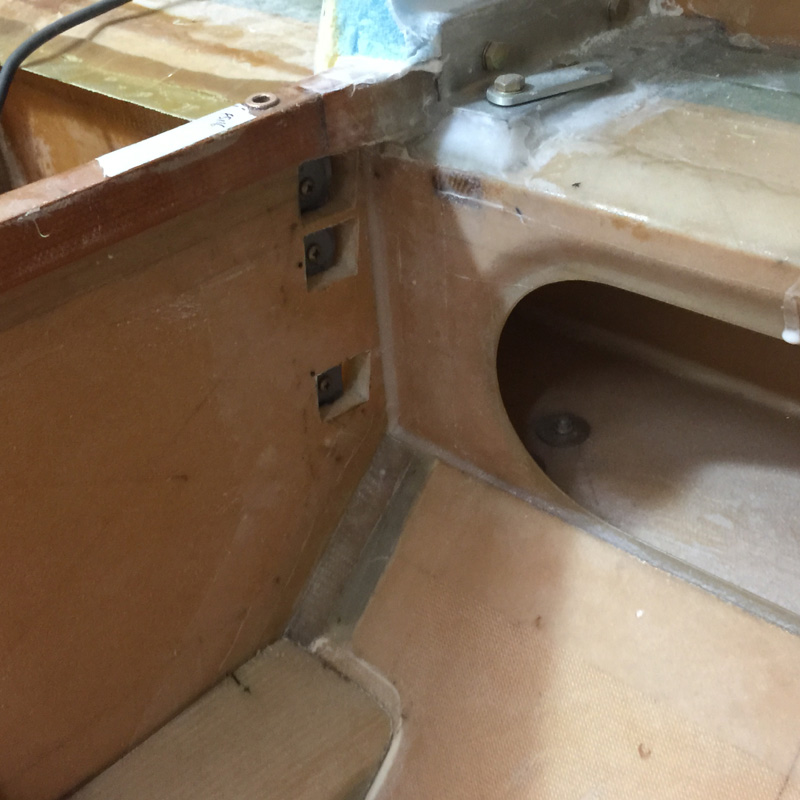
Yes I had to make a bunch of cut outs for the hard points. Here’s the one tank thinking…. I put the ‘full’ hardpoint on the right. Then I put the AUX ferry tank fuel inlet just below this also on the right and the 2/5 of a tank (3.2″) below that. So thats three hard points on the right.  On the left we have the 2/3 full at 5.3″ and the 1/5th full at 1.6″. This is shown in the last two pics.

So whats my rationale? I like to know when I have about 2 hours fuel left. That’s my 1/5 or 60 liter indication.  I also like the 120L number which is a good one for local flights given that I rarely fly less than 2 hours and I always include a fixed reserve.  The nearly full and 2/3 or 200L are markers for my auto top up for the ferry tank. This holds 250L maximum (so I have potentially 550L at MAUW) and I like the idea of topping up the mains so if the top up fails for any reason, I always have at least 200L to feed the engine.

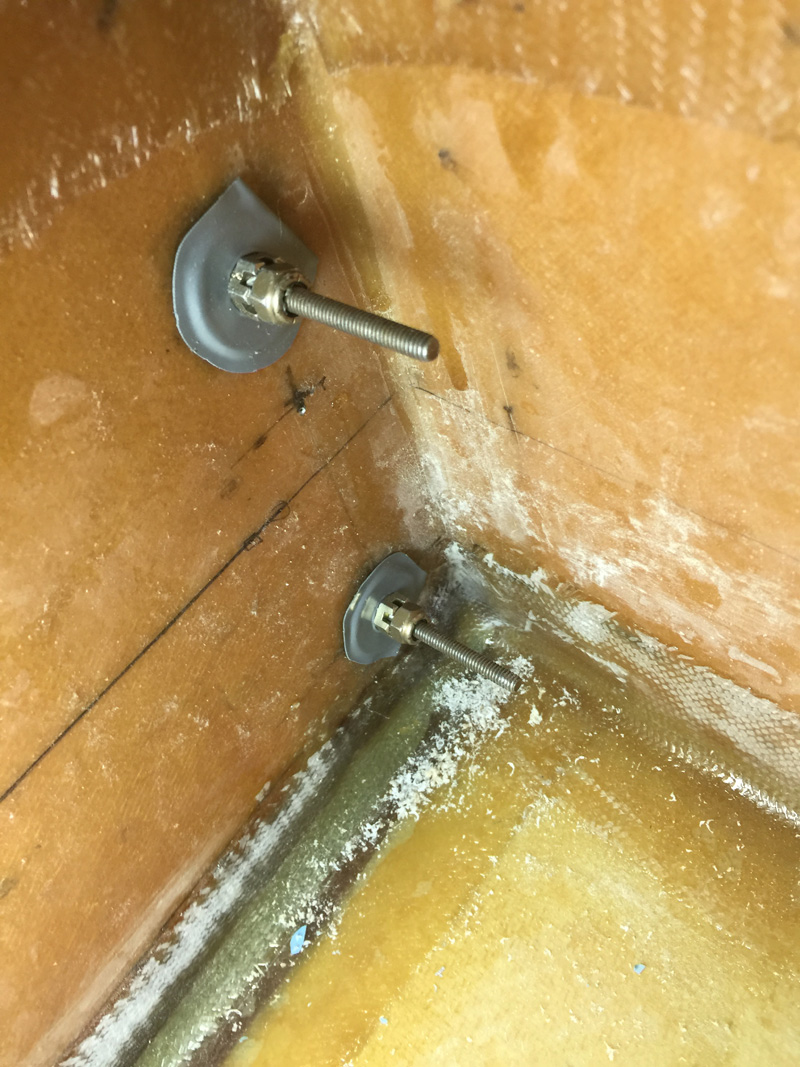
I’m doing these hard points in a couple of stages to ensure they are 100% fuel tight. First up is a system of washers screws and nuts to hold them in position for the initial flox to the inside skin of the fuel tanks (strakes). Also pictured is one of the fuel sensors.

Right side hardpoints floxed and held in place.

I used the castle nuts initially even though the thread was not a match but then decided to do it properly with a nut that would give me more ‘squeeze’. I’ve tried to mitigate for these fasteners getting stuck. We shall see if all the careful duct tape placement works.

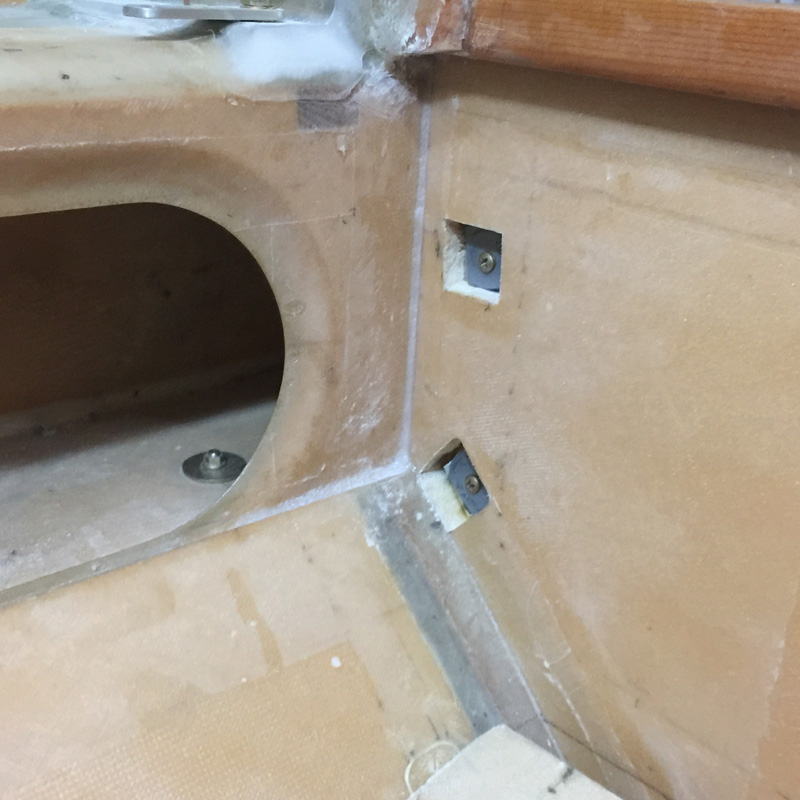
Right side with just the two sensor hardpoints.

While I won’t have a full cure tomorrow, I’ll get the fasteners off and see where we are for the next lot of flox for our 100% sealed result.


Previous Post
Right Strake Reinforcement Tapes
Next Post
More Fuel Gauges and Drain Points

Leave a Reply Cancel reply

Your email address will not be published. Required fields are marked *

Fill out this field
Fill out this field
Please enter a valid email address.

CategoryLogsHours
All159117236
Ch 3 Education220
Ch 4 Fuselage Bulkheads25231
Ch 5 Fuselage Sides32283
Ch 6 Fuselage Assembly30270
Ch 7 Fuselage Exterior14140
Ch 8 Roll Over/Seat Belts990
Ch 9 Main Gear/Landing Brake71642
Ch 10 Canard28287
Ch 11 Elevators36298
Ch 12 Canard Installation12102
Ch 13 Nose and Nose Gear1301113
Ch 14 CenterSection Spar57525
Ch 15 Firewall and Accessories448
Ch 16 Control System27237
Ch 17 Roll/Pitch Trim System654
Ch 18 Canopy70502
Ch 19 Wings, Alierons1271090
Ch 20 Winglets/Rudders71528
Ch 21 Strakes - Fuel/Baggage65437
Ch 22 Electrical System591031
Ch 23 Engine Installation1011168
Ch 24 Covers/Fairings/Consoles25202
Ch 25 Finishing571119
Ch 26 Upholstry340
Fuel System46310
Rollover1050
Cabin heating System60331
The Ferry Tank335
Blog2774278
Nose Gear Doors856
Wheel Pants/Gear Leg Fairing40473
Oxygen System762
Roll and Pitch Trim964
Winglet Intersection Fairings445
Baggage Pods11104
Pilot Side Windows437
RAM Air & Hellhole Cover15177
Main Gear Beef Up322
Post Cure124
Fire Extinguisher16
Wing Fences13
EVS (Enhanced Visual System)130
Hinge Upgrade115
Cowl Keeper110
Rudder Gust Locks19
Cooling21636
Taxi Tests42
Flying10

Bedding in New Rings

2026/06/30 10:26:01

Round Australia in Four Flights

2026/08/17 10:26:01

Round the World Departure

2027/08/22 10:26:01

Rough River Flyin, Sept 23, 2026

2027/09/23 10:26:01

© Copyright 2026 Dave Berenholtz