• Home
  • Flying
    • First Flight
  • Build by Chapter
    • Ch 3 Education
    • Ch 4 Fuselage Bulkheads
    • Ch 5 Fuselage Sides
    • Ch 6 Fuselage Assembly
    • Ch 7 Fuselage Exterior
    • Ch 8 Roll Over/Seat Belts
    • Ch 9 Main Gear/Landing Brake
    • Ch 10 Canard
    • Ch 11 Elevators
    • Ch 12 Canard Installation
    • Ch 13 Nose and Nose Gear
    • Ch 14 CenterSection Spar
    • Ch 15 Firewall and Accessories
    • Ch 16 Control System
    • Ch 17 Roll/Pitch Trim System
    • Ch 18 Canopy
    • Ch 19 Wings, Alierons
    • Ch 20 Winglets/Rudders
    • Ch 21 Strakes – Fuel/Baggage
    • Ch 22 Electrical System
    • Ch 23 Engine Installation
    • Ch 24 Covers/Consoles
    • Ch 25 Finishing
    • Ch 26 Upholstry
  • Build Mods
    • Liquid Cooling, Numbers, Weights and Flow
    • Cooling
      • Solving Ground Cooling 1
      • Solving Ground Cooling 2
      • Solving Ground Cooling 3
      • Solving Ground Cooling 4
      • Solving Ground Cooling 5
      • Solving Ground Cooling 6
      • Solving Ground Cooling7 – Test Data
      • Solving Ground Cooling 8 – Flap Building
      • Solving Ground Cooling 9 – Hinges
      • Solving Ground Cooling 10 – Lower Flaps
      • Solving Ground Cooling 11 – Upper Flaps
      • Solving Ground Cooling 12 – Completed
      • Solving Ground Cooling 13 – Update
      • Cooling the Beast 1
      • Cooling the Beast 2 – Lower Cowl Expansion
      • Cooling the Beast 3 – KW Oil Cooler Diffuser
    • EVS (Enhanced Vision System)
    • Cowl Keeper
    • Rudder Gust Locks
    • Wing Fences
    • Post Cure
    • Hinge Upgrade
    • RAM Air & Hellhole Cover
    • Main Gear Beef Up
    • Pilot Side Windows
    • Baggage Pods
    • Winglet Intersection Fairings
    • Titanium Rollover
    • Nose Gear Doors
    • Wheel Pants/Gear Leg Fairing
    • Cabin heating System
    • Fuel System
    • Roll and Pitch Trim
    • Oxygen System
    • The Ferry Tank
    • Cruise Angle Indicator
    • Fire Extinguisher Install
  • Round the World
    • RTW Route East #12 rev2
    • Survival Equipment
    • Training Flights
  • Other Stuff
    • Blog
    • Could You Reincarnate as an AI?
    • XEZ Long-EZ Interview Jan 2026
    • Around the World: RAAUS Sport Pilot Issue 110
    • Summary Feb ’24 from an SAAA Meeting
    • AOPA Pilot 27th Sept 2019
    • Taxi Tests
    • Build Tests
    • Flying Stories
      • A Long Easy Dream ’06
      • Townsville ’07
      • Cairns ’08
      • Albany ’08
      • East Coast ’08
      • Brisbane ’09
      • Cairns ’10
      • Perth ’10
    • Non Build Mods
      • F16 Scoop for JZE
      • Ram Air Box for JZE
      • Strange Tips
    • Milestones
    • Links
  • Contact

Blog

Home
Ch 11 Elevators
Fit Elevator Tubes to Cores

Fit Elevator Tubes to Cores

8 years ago
Dave Berenholtz
Ch 11 Elevators
Date:  12-02-2014
Number of Hours:  10
Manual Reference:  11-1

As happens so often I got a little nervous wondering if those NC1 lugs were in fact installed the right way around. If I had it wrong.. this would wreck the cores. I was only 90% sure I was right. In the end I drilled out the two rivets and tried the lugs the other way around.. pretty easy really.

I had a scale drawing of the canard and where the hinge pin goes was .4″ different to the way I had it and reversing the lugs might make mine per the Roncz drawing. Well……. what do you know. Reversing them means the rigging jigs cannot be fitted. Great so I had it 100% right despite the drawing. I riveted the lugs back in, this time knowing I’m correct. It was a few hours well spent in the end. Best to be sure.

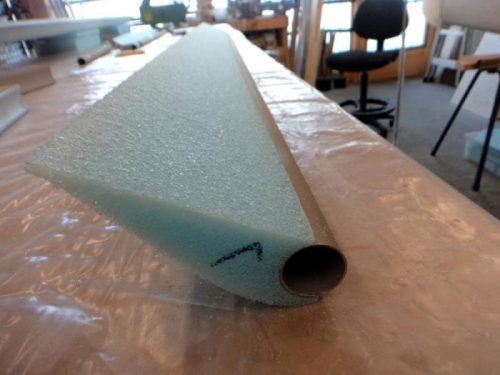
All this was after I had carefully sanded the cores so the tubes could be pressed in place. I cleaned the metal with a wipe or two of acetone and mixed some epoxy for the micro and pure. Of course I’d spent ages doing trial fits and working out how to secure things while it cured.

You can see in pic 2 those little triangles which are the rigging. These need to be flat when the bottom of the elevator is flat. This ensures the foam is in the right place on the tube relative to the lugs. Got it? I only have two jigs so each elevator was done on separate days after the first one cured.

Pic three shows them both done and the nifty profile templates. The gap in the pic is allowing for the thickness of the glass. I had to do a bit of smoothing out too when it joins the tube in prep for the skins.

Make it fit

Rigging jigs and glue

Tubes on the cores


Previous Post
Fitting those NC2 Lugs
Next Post
Bottom Elevator Skins

Leave a Reply Cancel reply

Your email address will not be published. Required fields are marked *

Fill out this field
Fill out this field
Please enter a valid email address.

CategoryLogsHours
All158917236
Ch 3 Education220
Ch 4 Fuselage Bulkheads25231
Ch 5 Fuselage Sides32283
Ch 6 Fuselage Assembly30270
Ch 7 Fuselage Exterior14140
Ch 8 Roll Over/Seat Belts990
Ch 9 Main Gear/Landing Brake71642
Ch 10 Canard28287
Ch 11 Elevators36298
Ch 12 Canard Installation12102
Ch 13 Nose and Nose Gear1301113
Ch 14 CenterSection Spar57525
Ch 15 Firewall and Accessories448
Ch 16 Control System27237
Ch 17 Roll/Pitch Trim System654
Ch 18 Canopy70502
Ch 19 Wings, Alierons1271090
Ch 20 Winglets/Rudders71528
Ch 21 Strakes - Fuel/Baggage65437
Ch 22 Electrical System591031
Ch 23 Engine Installation1001168
Ch 24 Covers/Fairings/Consoles25202
Ch 25 Finishing571119
Ch 26 Upholstry340
Fuel System46310
Rollover1050
Cabin heating System60331
The Ferry Tank335
Blog2764278
Nose Gear Doors856
Wheel Pants/Gear Leg Fairing40473
Oxygen System762
Roll and Pitch Trim964
Winglet Intersection Fairings445
Baggage Pods11104
Pilot Side Windows437
RAM Air & Hellhole Cover15177
Main Gear Beef Up322
Post Cure124
Fire Extinguisher16
Wing Fences13
EVS (Enhanced Visual System)130
Hinge Upgrade115
Cowl Keeper110
Rudder Gust Locks19
Cooling21636
Taxi Tests42
Flying10

Bedding in New Rings

2026/04/17 10:26:01

Round Australia in Four Flights

2026/06/17 10:26:01

Round the World Departure

2027/08/22 10:26:01

Rough River Flyin, Sept 23, 2026

2027/09/23 10:26:01

© Copyright 2026 Dave Berenholtz