• Home
  • Flying
    • First Flight
  • Build by Chapter
    • Ch 3 Education
    • Ch 4 Fuselage Bulkheads
    • Ch 5 Fuselage Sides
    • Ch 6 Fuselage Assembly
    • Ch 7 Fuselage Exterior
    • Ch 8 Roll Over/Seat Belts
    • Ch 9 Main Gear/Landing Brake
    • Ch 10 Canard
    • Ch 11 Elevators
    • Ch 12 Canard Installation
    • Ch 13 Nose and Nose Gear
    • Ch 14 CenterSection Spar
    • Ch 15 Firewall and Accessories
    • Ch 16 Control System
    • Ch 17 Roll/Pitch Trim System
    • Ch 18 Canopy
    • Ch 19 Wings, Alierons
    • Ch 20 Winglets/Rudders
    • Ch 21 Strakes – Fuel/Baggage
    • Ch 22 Electrical System
    • Ch 23 Engine Installation
    • Ch 24 Covers/Consoles
    • Ch 25 Finishing
    • Ch 26 Upholstry
  • Build Mods
    • Liquid Cooling, Numbers, Weights and Flow
    • Cooling
      • Solving Ground Cooling 1
      • Solving Ground Cooling 2
      • Solving Ground Cooling 3
      • Solving Ground Cooling 4
      • Solving Ground Cooling 5
      • Solving Ground Cooling 6
      • Solving Ground Cooling7 – Test Data
      • Solving Ground Cooling 8 – Flap Building
      • Solving Ground Cooling 9 – Hinges
      • Solving Ground Cooling 10 – Lower Flaps
      • Solving Ground Cooling 11 – Upper Flaps
      • Solving Ground Cooling 12 – Completed
      • Cooling the Beast 1
      • Cooling the Beast 2 – Lower Cowl Expansion
      • Cooling the Beast 3 – KW Oil Cooler Diffuser
    • EVS (Enhanced Vision System)
    • Cowl Keeper
    • Rudder Gust Locks
    • Wing Fences
    • Post Cure
    • Hinge Upgrade
    • RAM Air & Hellhole Cover
    • Main Gear Beef Up
    • Pilot Side Windows
    • Baggage Pods
    • Winglet Intersection Fairings
    • Titanium Rollover
    • Nose Gear Doors
    • Wheel Pants/Gear Leg Fairing
    • Cabin heating System
    • Fuel System
    • Roll and Pitch Trim
    • Oxygen System
    • The Ferry Tank
    • Cruise Angle Indicator
    • Fire Extinguisher Install
  • Round the World
    • RTW Route East #12 rev1
    • Survival Equipment
    • Training Flights
  • Other Stuff
    • Blog
    • Around the World: RAAUS Sport Pilot Issue 110
    • Taxi Tests
    • Summary Feb ’24 from an SAAA Meeting
    • AOPA Pilot 27th Sept 2019
    • Build Tests
    • Flying Stories
      • A Long Easy Dream ’06
      • Townsville ’07
      • Cairns ’08
      • Albany ’08
      • East Coast ’08
      • Brisbane ’09
      • Cairns ’10
      • Perth ’10
    • Non Build Mods
      • F16 Scoop for JZE
      • Ram Air Box for JZE
      • Strange Tips
    • Milestones
    • Links
  • Contact

Blog

Home
Ch 18 Canopy
Canopy Trim

Canopy Trim

7 years ago
Dave Berenholtz
Ch 18 Canopy
Date:  12-04-2017
Number of Hours:  6
Manual Reference:  18-2

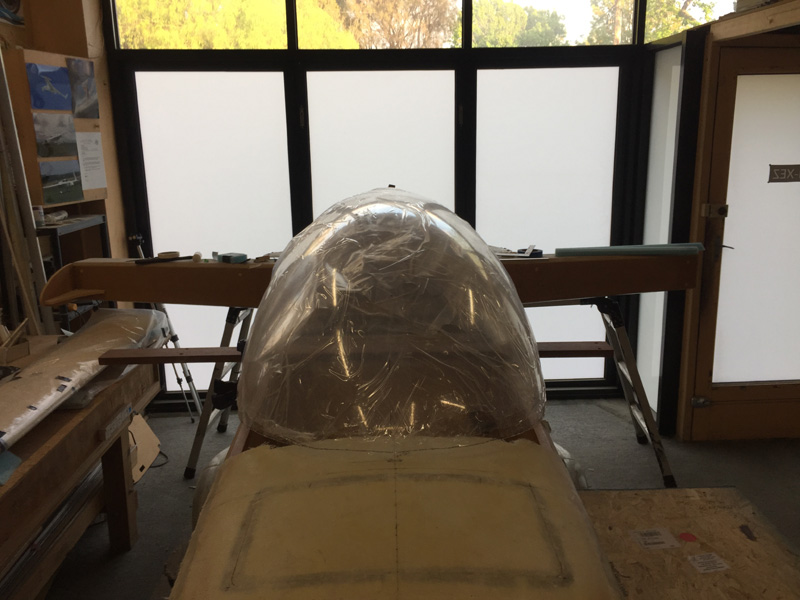
My second canopy is really a bit wide. 1.2″ too much at the thickest point beyond the specs sent to the maker. To be fair he was pretty close. I went back to the canopy guy but I’m pretty much stuck with this one. I’m not going to pay for another canopy and perhaps that wouldn’t be as good as this one.  I’m not going to be able to make it perfect at the sides as I planned, it is going to bulge out a little. That’s any chance of a Concours d’Elegance at an airshow out the window. <sigh> Good thing too as there is only so much time I can spend of finishing work anyway. I’ll go for a ‘good’ finish but I want to go flying not polishing!

Today I made two cuts to the bottom edge of the canopy. The cutting itself takes about ten minutes the rest of the time ensuring its in the right place. I took two inches off the bottom after a lot of thought. Then I checked everything and took a 1/4″ wedge further from the rear up to 15″ from the canopy front. I’ve used a dremel with a special plastic 2.5″ diameter cut off wheel (EZ476 cutting wheel with the EZ402 holder). I broke that nearly at the end of the first cut and tried the same size metal cutting disc (EZ476). There was hardly any difference. They both did a good job.

For the second 1/4″ to zero cut I measured the 1/4″ at the rear and checked it both sides with a center point marked on the top of the canopy using a bit of paper as the measuring device. Then I taped a bit of cotton to the side where I wanted to make the cut. I stretched it to the 15″ front mark making that zero and so had my wedge. I then used the paper and the center marks on the top of the canopy to ensure the cotton was the same length from the middle on both sides. When I was happy I taped the cotton down with clear tape and that was my cut line. It is probably a strange way to do it but it worked.

The angle to the firewall is pretty good now. I can’t fix the width problem but it won’t be too bad except quite a challenge to set up a frame.  I have a full 2 inches above the plans canopy height minimum at the pilots head. This is going to make a huge difference to side vision as well as over the nose.

Here’s the canopy showing you how it overlaps at the sides. I’ll force it in a little at the canopy rail and try to widen that as well. I may even try to augment the sides fractionally. Who knows at this stage?

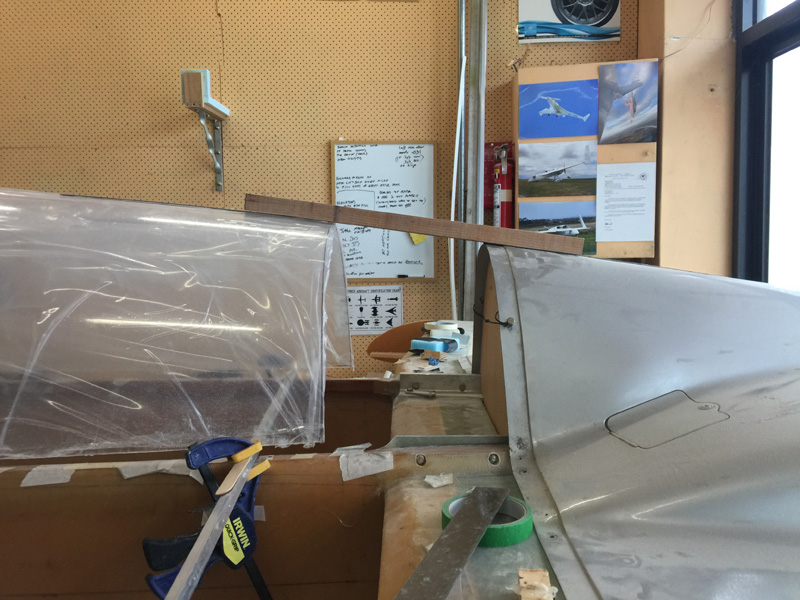
Here the rear to the firewall. That gap is about 12″ and the plans say 8″. I have my canopy well forward so it will be a slightly enlarged area here.

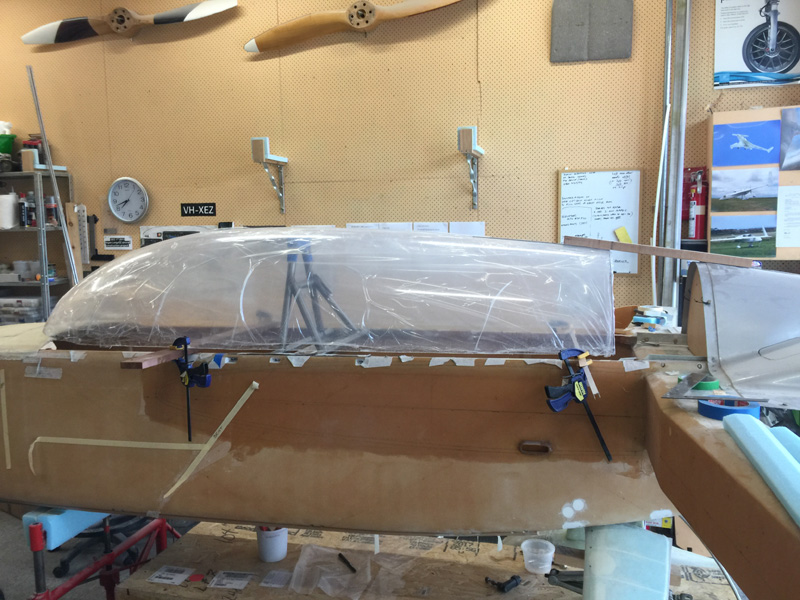
Here’s a good look side on. The profile is what I always wanted. The highest part right where the pilots head is. I could go back 2 to 4 inches here still with the high point at the maximum and may do so.  That will improve the passenger side vision while not effecting mine. You have to love the design process when its ‘on the fly’. If I go back I will have more room for fresh air vent/s to the pilot at the sides. It just might happen.


Previous Post
Canopy Ver 2.0 First Look
Next Post
Canopy Nose Prep

Leave a Reply Cancel reply

Your email address will not be published. Required fields are marked *

Fill out this field
Fill out this field
Please enter a valid email address.

CategoryLogsHours
All157617079
Uncategorized135
Ch 3 Education220
Ch 4 Fuselage Bulkheads25231
Ch 5 Fuselage Sides32283
Ch 6 Fuselage Assembly30270
Ch 7 Fuselage Exterior14140
Ch 8 Roll Over/Seat Belts990
Ch 9 Main Gear/Landing Brake71642
Ch 10 Canard28287
Ch 11 Elevators36298
Ch 12 Canard Installation12102
Ch 13 Nose and Nose Gear1291097
Ch 14 CenterSection Spar57525
Ch 15 Firewall and Accessories448
Ch 16 Control System27237
Ch 17 Roll/Pitch Trim System654
Ch 18 Canopy70502
Ch 19 Wings, Alierons1271090
Ch 20 Winglets/Rudders71528
Ch 21 Strakes - Fuel/Baggage65437
Ch 22 Electrical System591031
Ch 23 Engine Installation961152
Ch 24 Covers/Fairings/Consoles25202
Ch 25 Finishing561084
Ch 26 Upholstry340
Fuel System46310
Rollover1050
Cabin heating System60331
The Ferry Tank335
Blog2694182
Build Mods2252513
Nose Gear Doors856
Wheel Pants/Gear Leg Fairing40473
Oxygen System762
Roll and Pitch Trim964
Winglet Intersection Fairings445
Baggage Pods11104
Pilot Side Windows437
RAM Air & Hellhole Cover15177
Main Gear Beef Up322
Post Cure124
Fire Extinguisher16
Wing Fences13
EVS (Enhanced Visual System)130
Hinge Upgrade115
Cowl Keeper110
Rudder Gust Locks19
Cooling20607
Taxi Tests42
Flying10

Complete the Test Flight Program

2025/6/30 10:26:01

Round Australia in Four Flights

2026/4/1 10:26:01

Round the World Departure

2026/8/22 10:26:01

Rough River Flyin, Sept 23, 2026

2026/9/23 10:26:01

© Copyright 2025 Dave Berenholtz